Disclaimer: I'd never reupholstered anything before this chair, but I had the gumption to take on the project anyway. There is not a lot of extraordinary skill involved, just patience and determination. Nothing difficult, just a little time consuming. But, the recognition at the end (when people comment that the job looks professional) is worth the effort. Go for it!
Here's what you need to get started:
*Wingback chair
*Fabric to recover with (Fantastic chart for how much fabric you'll need
HERE from
All Things Thrifty)
*A screwdriver with the thinnest edge you can find (you will be using this to pry out the millions of staples)
*Gloves (I went rebel and didn't wear any, but my hands almost revolted on me)
*A sheet or blanket to lay on the ground (you'd be surprised at the amount of dirt & stuffing dust, seriously)
*A sewing machine (although you'll probably only need this for sewing piping and the cushion)
*Stapler (electric preferably, and also one that actually works--trust me, it's worth it)
*A hammer
*A container to hold removed staples
Upholstered chairs are built like an onion. One piece at a time. I was surprised when I heard there was very little sewing involved. It's true, except for the cushion and the piping.
**After each piece is taken off, label it with its location and number. The pieces go on in the same order they came off, and while this step seems lame, it's actually really important to keep them organized**
Here's what I started with:
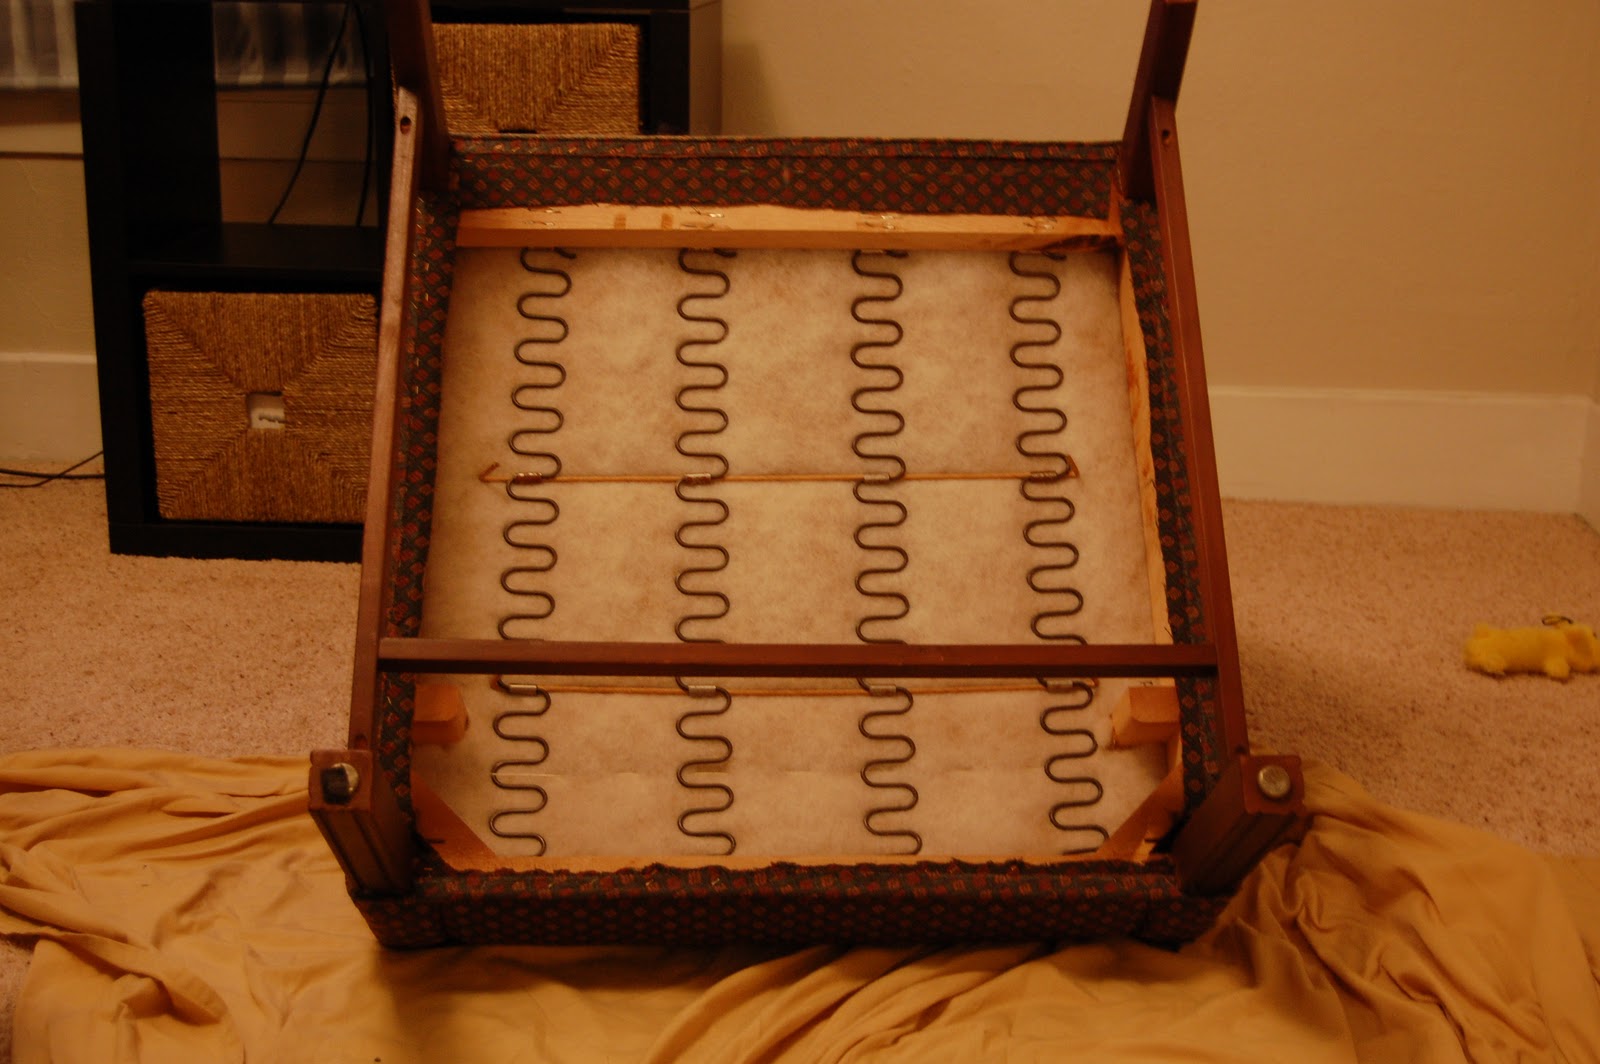
Lay down the sheet, and turn the chair so the legs are in the air. Start by removing the staples from the black piece on the bottom of the chair (usually a black-mesh material). Remove every staple you see.
This is the most tedious and heartbreaking part of the process. Don't get discouraged. It doesn't look like you've done much, but the staples on the bottom and back took me the longest.
Remove cardboard and piping (if you have it). Then put the chair back upright. The next piece is the back.
The best way I can explain it is to use your screwdriver between the edge of the fabrics (on the sides) and pry the tack board from the chair. The tack board looks like a long strip of metal with teeth on it.
 |
| I stole this picture from The Creative Maven who has a great tutorial (that I referred to) on recovering a wingback chair HERE |
The top and top edge will probably have what others have lovingly referred to as "sharp metal teeth" (**I just learned that it's called Ply Grip). The fabric is folded into them. Pull it out and pry the metal teeth down. Just be careful not to injure yourself. The teeth are sharp. Sharp metal teeth close-up.
Continue working on the layers you can see. Take out all the staples you see along the way.
Now you're going to work on removing the sides. Those sharp metal teeth will also be on the top part of the sides. You're likely to find cardboard strips in the other places (down the side and under the armrest). Try to keep these pieces together once you remove them.
You'll find stuffing, most likely also stapled to the frame. That will be a headache, but remove it anyway. Label which side it goes to.
Note: The sharp teeth strips will need to be removed to get to the under layers of the fabric (and piping). Keep in mind the order they are layered on. And when you remove the sharp teeth, try to keep in mind that you can reuse them, so try to keep them intact. Label and put aside.
Then you can take off the decorative thing from the arm rests. Mine were literally nailed in. Use your screwdriver to pry them off. Or a hammer, if that's easier.
Do the same to the other side. Then remove the armrest fabric pieces (mine were attached/sewn to the inside sides.)
If you haven't already, remove the backrest and also the piece under the cushion over the seat.
Naked chair. Take a breath, look at your handiwork. Then get back to work. It's not going to recover itself.
Lay out your fabric pieces (see my labels?) and cut out your new pieces. Keep the old with the new for the time being (that way if you have any questions you can refer to it for placement.) If any of the pieces are sewn, use a seam ripper to take them apart to cut new fabric and just re-sew them like the original.
Pull out the cord from the old piping and sew new piping the same length.
Best tutorial for sewing piping.
If any of the pieces are sewn, do this now.
Start with the last piece you took off. Presumably the piece under the cushion. Staple one side and then pull the other sides tight. Tight enough to keep the fabric taut, but not so tight the fabric will rip.
Then the armrest/inside side pieces (which were sewn together on mine). Then the backrest.
Then the piping on the outside sides.
Now comes the tricky stuff. All I can really say here is if you watched how it was assembled as you were taking pieces off, then you'll be fine. The sides were a little tricky for me, especially around the armrest curve. Use the cardboard pieces for an even edge. Lay the fabric (upside down over the armrest) and place the cardboard on the underside up next to the piping (see below). The cardboard ends where those awesome metal teeth begin.
Add back on the decorative armrest things. I hated this step. I couldn't get nails to go in straight. Do the best you can to attach them.
Then attach the back piece. Start with the fabric at the top held in with the metal teeth. Then work about the tack board sides. This piece was the hardest for me. It takes a bit of time to get everything tight, but you're in the home stretch! Then flip the chair over and put on the bottom trim and that lovely black mesh piece and you're done!
Ta da!
And I'm not going to go into great detail on the ottoman, because once you reupholster the chair, the ottoman is a piece of cake. Although mine involved more sewing. Just start from the bottom and work your way until the piece is again naked. Then recreate it.


10 comments:
I am so happy I stumbled upon your blog! I just got two wingback chairs and want to attempt reupholtering one of them for now...I'll do the other one later if I'm able to accomplish the first project! Thank you!! :)
Thanks for stopping by Sandra. Hope it's helpful. If you have any questions, feel free to ask.
You did such a great job!!! Thank you for commenting on my fabric pin so I could see this. My mom and I recovered a chair last summer - what a pain in the butt! It was well worth it to see the results but a serious pain during the sides and staple removal.
Okay, this may be a really dumb question, but I just bought two chairs and am trying to learn how to do this before diving in!
How is the piping attached? Are you sewing it on to the other fabric?
thank you!
@Megan M. Not a dumb question at all. The piping is just some (in my case) nylon cording sewn into fabric (i.e. take a strip of fabric, lay the cording on it, fold the fabric over and then sew a seam along the cording.) Once you sew the strips of piping (to the same length you took them off the chair at) you staple those pieces on like all the rest. Once you sew the strips, you don't generally have to sew them to any of the other pieces (except a couple of the arm pieces of my chair were sewn together--but you'd be able to see that when you took your chair apart). The piping just goes below the layers. Think of the chair as an onion with a bunch of layers.
I promise that you'll understand a whole lot better once you start digging in and taking your chair apart. Just be sure to go slow, take lots of pictures, and label the pieces well (and in the order you took them off/where they go) and you'll be fine.
Let me know if you have any other questions.
You did a really good job! I am about to tackle my own wingback that is pretty similar to yours. I know you posted the chart to estimate how much fabric to use, but do you mind telling me how much you used to do this chair specifically?
Hi Becky,
I wanted to make sure that I had plenty of fabric to cover my wingback chair AND ottoman, so I ordered 8 yards of my fabric. Honestly though, I probably had 2 extra yards when I was finished. Something to consider though is if you're using a repeating pattern, because you might need the extra yardage to match that pattern with your fabric patterns. Hope that helps!
Great tutorial and great job!
Just found this through pinterest. I'm going to attempt this on a chair and ottoman of my own. Did you have to buy special fabric that was more durable or will any fabric work?
Hi Lana,
Technically you can use any kind of fabric that you want for reupholstery, but the thicker, upholstery fabric will hold up a lot better to wear and tear. If you're going to reupholster a wingback chair (or anything similar), I'd recommend you use the thicker fabric. It's worth the extra money to not have to re-do the whole thing in a couple years-- which is what I've heard from people who have covered items in 100% cotton quilting fabric. Let me know if you have any other questions!
Megan
Post a Comment