Tuesday, November 29, 2011

Hi, my name is Megan and I'm an Introvert.

I'm an introvert in my core, but through culture and prompting, I'm sometimes forced into semi-extroverted roles.  That's one of those interesting paradigm shifts where I try to figure out my role in a world with my spiritual gift of leadership along with my natural inclination to fade into the background.
Source
Sometimes I feel like I've been placed in a really unique role.  With a foot in both worlds.  And a voice that isn't always heard.

Disclaimer: There is a lot of misunderstanding between both Introverts & Extroverts.  I'm not saying that I understand the intricacies of all extroverts.  Just like I don't understand men.  I speak only for what I've seen and sensed.

For most of my existence I've felt misunderstood.

I had an epiphany of sorts last summer when I realized that extroverts frequently try to "convert" introverts.  Not the other way around--that would just be silly, right?

I've grown up in a culture that praises the extroverted.  And for a long time, I felt like I was broken.  I made strong efforts to join the extroverts.  And I usually failed.  More recently I let go of the desire to be extroverted--regardless of the value I believed came with that title. There was a certain freedom in accepting myself as I was created while seeking to find the balance between pushing myself out of my comfort zones to do the work God had created for me, and trying to be someone that I definitely was not created to be.

During leadership conversations centered around "drawing out the quiet students", I usually find myself reaching unusual levels of frustration.  The key is figuring out the difference between "just shy" and "naturally introverted", and then finding appropriate ways to stretch those people without making them think that they must act a different way to "be normal".  What the extrovert doesn't see are the high levels of anxiety and frustration that go along with "being extroverted".  For me, instead of enjoying where I'm at, I'm social conditioned to constantly question myself.  "You should be more social" turns into an overwhelming task at times--one I frequently "fail".  And the failure to live up to these social norms is surprisingly upsetting/frustrating.

When you start trying to mold introverts into fake extroverts you invariably dismiss the valuable role that introverts can play.  Those are usually the few moments I feel emboldened enough to speak up.  For those of us who typically won't. 

The roles are going to look different, just like each individual person holds a unique gifting.  Generally speaking though, introverts aren't going to naturally volunteer for roles that require microphones, or costumes, or center stage.  But limiting volunteer choices to the obvious can be troublesome for introverts.  They want to serve, but if you don't create appropriate roles, they're likely to step back and question their ability to help at all.

There is a beautiful interplay between extroverts and introverts.  A natural balance.  I'm confident that this balance can bleed over perfectly into kingdom work.  We just need more leaders who are able to identify those roles for the people who don't feel like they fit in as they are.

Tuesday, November 22, 2011

Today's headache

My frustration, in an act of rebellion, seems to have turned itself into a massive headache.  Sweet.

Today it's also hanging out with the overwhelmingly crushing feeling of defeat.  They're great pals.

Not a great day.  Feels like a giant step backwards.  **sigh**   My fault, my fault.  I know.

Wednesday, November 2, 2011

Pinterest Challenge: DIY State Art

I linked up to a Pinterest Challenge today on my other blog. Be sure to check out my post on my DIY State Art here: http://megeletto.wordpress.com/2011/11/02/pinterest-challenge-diy-state-art/

Monday, October 31, 2011

A second blog for you to follow.

Interested in following my house projects?  Visit my new blog HERE.  I've been having so much fun working on my projects that I've decided to share them on my blog.  Jump on over and check it out!

P.S. I'll still be posting my own personal life reflections here.  It just made more sense to have two different blogs (for different purposes).  Plus, I'd been itching to play with Wordpress for a while now.

Wednesday, October 26, 2011

Art-sy

My roommate's brother came to visit a couple months ago.  I admittedly didn't have a whole lot of contact with them, but in one sparing conversation he told me that he liked my house, and that it "had an artistic feel to it".

Honestly, his comment blew me away.

I had never looked at my house as "artistic".  In fact, I was still living under the phrase, "I'm not artistic, I can't even draw stick figures well".  I truly had given up on "being artistic".  I didn't draw, or paint, or sculpt.  I wasn't an artist--I was left-brained.  I repeated it so often that it became my reality.

Hearing that comment made me open my eyes.  And then I read this post by Steven Furtick about how no one is really "original".  I was dumbfounded.  I've done a LOT of projects in the last year--many of them reproductions (with tweaks) from others.  I had undervalued my own artistry.  Crazy.

Me?  An artist?  It's still so weird.  But I've at least come to terms with the fact that an "artist" isn't bound by certain mediums or productions.  Everyone is an artist.  Even me.

Tuesday, October 25, 2011

Restraint

I learn random facts about myself all the time.

This is what I'm learning right now.  I'm not good at keeping things to myself. I have an incessant desire to share almost everything.  It's absurd.  And with technology at my fingertips, I usually do end up sharing.

Disclaimer: If it's important not to share and it's another person's news, then I can usually make it, but it's HARD.


I'm being taught restraint.  And it's really difficult.

I want to tell people, but I know I shouldn't.  So I try to think of why it would be "okay" just this once.  And then I just clamp my mouth with wood clamps close my mouth and let the moment pass.  It always does.  And I'm just the same as I was before.

I'm learning restraint.  But I'm also learning that I share things for a reaction.  It's causing me to reevaluate the things I feel drawn to tell people.  Sharing ideas, thoughts, feelings, and memories with people isn't wrong, but some of my motivations are.

I'm also learning how conversations, while great for processing certain things, stretch ideas or concepts or feelings.  Just like throwing pizza dough.  Each conversation moves things forward or backward.  But always moving.

I don't think this one is supposed to move.  At least not now.

Sunday, October 23, 2011

Flexible

I met with an amazing group of girls last Thursday night.  No agenda.  Just dinner and random conversations.  It was an evening rich with laughter and honesty.  One of those beautiful side effects of community.  I think I finally found it.

Part of the evening revolved around the meaning behind names.  How they are given and how sometimes we need to "grow" into them.  Each first and middle name was looked up and shared with the group.  These are always the moments where I feel a little disappointed that my name wasn't something cooler--or that it didn't describe me well enough.  Okay, okay, the meaning wasn't terrible.  My first name was something like lovely person--boring enough that I can't really remember it.  What really felt like the oddball to me was my middle name, which translated into: flexible.  Practically the opposite of how I feel and act 90% of the time.  I laughed it off and put it out of my mind.  Until another friend called me out and told me that I'm in a great place to practice adaptability, aka: flexibility.  Oh the signs God uses to get my attention. 

I've tried looking up my middle name again online, perhaps for an overwhelming "ah-ha!" moment from God.  But it must have been an error.  Or was it?

I'm being called to be flexible.  Regardless of what my middle name translates into.  More stepping outside my comfort zone, more leaping into the unknown, and more actions that feel risky. 

I'm being called to bigger things.  More than I'm able to do when I'm hunkered down in my "comfort zone".  Big risks, big rewards, more kingdom glory.  A lot more flexibility.

Thursday, October 20, 2011

Acceptance

Today feels strange.

An important date in a failed and unrecoverable friendship.

And a flashback to a year ago.  To an unattainable place of want.

So it looks like today is a lesson in acceptance.
Souce
Acceptance that the past is the past.
Acceptance that I'm healthier now than I was last year, or three years ago
Acceptance that all things happen for a reason

And acceptance that the future holds mysteries I can't fathom--trying to imagine them right now will probably just lead to disappointment.  To accept the mystery, and to let go of "wishing for what was" instead of "appreciating what is".

Tuesday, October 11, 2011

Control

I wish I could say that each day is sunshine and cupcakes.  Coated with a healthy layer of glitter and unicorns.  Not so.
Source
Life doesn't feel, metaphorically speaking, like a desert, or a season of winter, or anything like that.  Life just feels..... hard.  It's safe to say that 99% of my mornings (that aren't weekends) are greeted with the "I absolutely, positively do NOT want to get up today".  But I do.  Mostly because I have to.

It's a season of not feeling valued or heard and constantly feel inadequate.  I struggle to be in that place.  I struggle to stay quiet and let the lessons of patience and humbleness roll over me.  I constantly feel constrained by my age and my gender when I choose to speak up.  I wonder, frequently, if I'm any good at my job--even though I've been here for two years now.  I'm so far away from "I love what I do" that I'm now in a "I know I'm supposed to be here right now, but I hate it" place.  Each day is a battle not to cry.  Not to break down.  Not to lash out and throw glass objects haphazardly around the room in frustration.
Source
So, in an effort to control my world (or just realign my sanity), I do "projects" (some of which can be seen HERE, HERE, HERE, and HERE).  In a manic, "you'd think I was crazy if you actually knew" kind of way.  I love my house, I love my projects (and take an absurd amount of pride in them), but they approach the line of "crazy" often.  They provide control though.  Something I'm able to do well.  A place where I'm able to succeed.  And some days, if I can't be successful at something then I really do break down. 

Probably the biggest theme here is "control".  Big surprise there, right?  But I'm not quite sure how to relinquish all control without my world spinning violently on its center.  I am assured, however, by the reminder that life changes can start small and grow.  I can't have the prayer life of Paul immediately, but I CAN pray for two minutes a day and let that habit grow through repetition.

So, for my daily reminder of the day, I look to the yellow index card I've had for more than four years.  The same one that I took for my study abroad program in Mexico, that I've taped on walls, and that I currently have attached to the bottom of my monitor screen at work.  It's something that I need to see everyday, and a calming reminder each and every time I read it.  Funny how familiar scripture can seep into your life and form a certain level of comfort over rocky and irritated places.  That's what Philippians 4:6-7 does for me.

Tuesday, October 4, 2011

Guilt

My life is punctuated with feelings of guilt. I'm not who, I perceive, someone needs ms to be. I feel guilty I let them down. I feel overwhelmed because I am contemplating skipping a monthly meeting I feel obligated to attend. Guilt. I don't even have to do something offending to feel guilty.

I was reminded today, by a good friend, that feeling that guilt is a choice by me. While I agree with this friend, I'm lost in the nuances of it. Should I feel guilty for actually missing the meeting? Or is that unnecessary as well?

Is guilt's only place meant for sinning against Christ? Specifically left at the base of the cross.

Monday, October 3, 2011

Just to know you and be loved is enough

"Just to know you and be loved is enough
God of heaven come down, heaven come down."
-Robbie Seay Band

I heard this song on the radio yesterday and it hit me.

Is knowing God and knowing that He loves me enough for me?  Or do I expect more?

I'm challenged to let this truth sink in today.  To let Jesus be enough.  No strings.

Tuesday, September 27, 2011

Home again

Sometimes I think I dream in the impossible. But for today, that's okay.

I thought I had lost a part of me a couple months back.  It sounds weird to say, but it emerged again yesterday; in a beautifully hopeful kind of way.  I couldn't explain it to you, but it felt like home again.  So happy to be back here.

I still don't know where I'm headed, but I'm learning to accept that.  I'm also, for the first time ever, appreciating the journey alone.

Funny how things work out.

Monday, September 19, 2011

Is it Friday yet?

There is something so luxurious about the idea of waking up, but curling right back up in bed to pour over a book.  Something magical about forgetting everything around you and falling into a completely different world full of people you "know" but who don't know you.  If only it were morning and I had that luxury.

There are a few things I would love to temporarily escape from presently.

One of them being the nice graffiti tagging done to the back of my shed.  According to my roommate (who has Mondays off), the police dropped by.  I officially have FIVE days to remove it.... or else?  I suppose there is a fine of some sort if I don't.  Since I don't typically hang out in the back alley (um, ever) it's sure nice the cops let me know and gave me such a reasonable time table to paint a 6x12' wall.  Dumb teenage kids with nothing better to do.

They should read more books.  Then they'd have less time to tag things.  AND I would have more time to read books.  Sounds like a win-win for all.

tough conversations

I suppose it's only fitting for tough conversations to be preceded with tough emotions.  My stomach feels like a sailor got hold of it and tied it up in knots.  I dread that conversation, but I know that the knots will not go away until it is had.  Trying to decide which is worse is a terrible decision. 

I tried really hard, but mostly I just feel like I failed.  And there is an undeniable frustration in why it had to be this way.  Why couldn't I fix it?  What was the problem?

Life seems a little surreal.

Somehow I drifted from where I was.

For good and for bad I guess.  I'm not who I was a year ago.  I'm not where I was a year ago.  And I'm still not sure how I feel about that.

There is safety in "same-ness", in the unchanging, daily routine.  Part of me feels like I somehow got off the path.  I'm not far, in fact, I can still see the path I want, but I'm stuck at the divide.

Either laziness or fear separates me from where I know I should be.

Friday, September 16, 2011

Happy 1-Year Birthday House!

It's hard to believe that it has been a year already!  I can still remember back to the day I got the keys, the first night I spent (on a mattress in the upstairs landing), and so many Ikea trips that I'm sure I can't still count them on fingers and toes.  I've been busy this year, pretty focused on making the house "mine".

Forgive the iPhone pictures, but I thought it might be fun to see some comparison photos.  What it looked like right before I got the house (some of the previous owners stuff is in the pictures) in Sept 2010, and what it looks like today, Sept 2011.

Plus, who doesn't like a good house tour??

Here's the outside.  Probably one of my favorite changes actually.  I absolutely love the new color!
2010

2011... probably should have been better about watering my lawn though...

Now, inside to the living room
2010
2011... I still have plans for some black & white striped curtains in here


Dining room, the largest room in the house.
2010
2011... the light fixture was a lot of fun to create, and building a table the right size for the space made such a difference in this room.


Downstairs bathroom
2010
2011... not a whole lot of changes, but I have some future plans to install a shower in this bath.


Kitchen
2010
2011.... not much has changed.  Watch for big plans to paint the cabinets white.... as soon as I have an extra burst of painting energy.


Downstairs Bedroom/TV room
2010 (another terrible picture, the angle was strange)
2011... the curtains need to be hung higher and it needs a table lamp, but other than that, this space is pretty complete.


Upstairs Landing.
2010 (Apologies for this extra-terrible picture--they had this room painted a chocolate brown, which didn't help in my picture-taking effort)
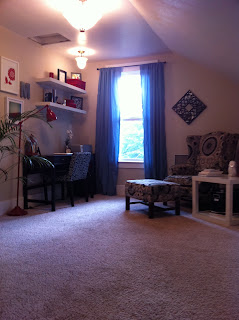
2011... the room color makes the room seem larger.  Reupholstering that chair was one of my major projects this year.  And that crayon art might be my favorite DIY project to date.


Upstairs Bedroom #1 (smallest)
2010
2011.. this is my bedroom now.  It's small, but I love it.  Most recent repair was getting this uneven door/frame to mesh so that the door would latch.  It's the small things that I love.


Upstairs Bedroom #2 (middle sized)
2010
2011... this became the "roommates" room.  I've already had two of them.  Ashley painted it the dark grey and hung the lanterns.  It turned out really well.


Upstairs Bedroom #3 (largest, but smallest closet)
2010
2011... now it's the "closet".  I love this room.  The previous owner had put up all the shelves and bars, and after a little paint, some stain, and new curtains, this room looks amazing.  Big plans for a DIY rug in the making.


Upstairs Bathroom
2010
2011... the room hasn't changed too much, although the shower (behind the door) got a beautiful, glass shower door.  This weekend I'm painting it, but a very similar color. We loved the color, but the previous owner didn't have any spare paint for this room, and I'm tired of looking at white spots on the walls.


Backyard
2010
2011... aside from dead grass, no real changes.  I spent the year watching random flowers bloom all over the yard, and pulling weeds until I got blisters.  Maybe next year I'll figure out what to do with the space.

Monday, September 12, 2011

Grocery shopping

Something that I loathe more than running in the hot?

Grocery shopping.

So I don't.  Until I absolutely have to.  Which is probably how I've gone a month without milk.  Or butter.

I'm nothing if not resourceful.  Or maybe I'm actually just crazy.

Somehow I manage not to starve though--so it all works.

Thursday, September 8, 2011

Running--you know, that hobby I supposedly really enjoy?

I'm back to work now.  My month-long furlough is unfortunately over.  My house projects were sure grateful for the extra time though, but my sleep cycle is all kinds of out-of-whack.

If I told you my actual dreams, you might have me committed, so I'll spare you.  Suffice it to say, I'm sleepy. A lot.  This means that mornings are très difficult.  I'm supposed to be running--you know, that hobby that I supposedly really enjoy?--but mornings thwart me every time.

every. single. time.

I set my alarm for plenty early (without leaving too much excess time), and I routinely wake up to my alarm, in an almost-panic-but-too-exhausted-to-think-of-anything-beyond-more-sleep state of alert.  Hit the button, lay back down, and assure myself that my lack of sleep this particular morning is totally reasonable and worthwhile.

And that's probably where I've learned how to lie (to myself) convincingly.  I must be pretty naive though, because I'm 100% terrible at lying to anyone but myself.  Odd giggles and smirks almost always give me away.

So, I bask in the completion of a (relay) race that I've always wanted to run (Hood to Coast), and instead of guarding the precious "in shape-ness" that I spent weeks attaining, I sleep for another 30 minutes.  Usually with the false belief that I "will run in the evening".

Who am I kidding?  It has been in the 90's this week and last.  And my semi-traumatic experience with looking white as a sheet after trying to run four miles in the Portland 90° heat, and the fuzzy memories surrounding it, don't help my giddy-up when it comes to running motivation (in the heat).  I do just like the wicked witch of the west and melt.  No water required though.

Pretty much just like this.

I see all those crazy people out there, running in the heat of the day anyway.  I can't decide if they're super-human or super-crazy.  Either way, it's a no-go for me.

So, logical Megan realizes that runs cannot be counted on to occur in the wee morning hours (with any regularity) and must occur at night.  But for that to happen, the weather must shift to cooler, it's-the-beginning-of-your-nine-month-winter weather.  And it's only September.  Way too early for the rain to start (and never stop again).

For as long as it took to get an actual summer (not until the beginning of July), I'm sure quick to send it back on it's way.

Perhaps if it could just be 40-50° in the mornings/evenings and 70's for the rest of the time.  Unrealistic?  Stupid El Niño/La Niña or whatever.  I need less extreme weather.  Pronto.

Friday, August 19, 2011

DIY yellow cluster necklace

I loved this necklace, but couldn't find it anywhere online to buy--according to a Marie Claire webpage the original price was $190.  So I decided to DIY it instead.

Time: about 2 hours

Cost: $15.27 (metal necklace supplies: $9.97; beads: $5.30)

Here's what I bought (everything from Michaels Craft store, except the beads.  The beads were from www.usbeadery.com):

*Chain
*Clasp set
*Eye pins

 *Beads (2 sizes) from www.usbeadery.com


Acrylic opaque yellow round 18mm
Acrylic opaque yellow round 12mm

You'll also need some wire cutters & pliers.  Here are all of my supplies


First, cut your chain to the desired length, then attach your clasp set to the ends.  Remember that the beads will make the chain a little bulky in the end.

Then, start with your larger beads.  Take an eye pin and string it through the bead.  Then use your pliers to bend the eyelet of the pin over so it lays flat against the bead (I liked this look better in the end, and I was unable to find pins like in the inspiration pictures--flat head--that were big enough to hold the beads on).

Then string your eye pin onto the chain
Cut off some of the excess eye pin with your wire cutters
Then use your pliers to bend the eye pin around to secure the bead to the chain.  Loop the loose end around like you're trying to insert it into the hole of the bead.  You're essentially creating a loop with the eye pin.

Continue beading the large beads, then move on to the small ones, filling in the holes as you like.  I held the necklace up each time to see where I wanted to add more to.
And then you're done.  Super easy.
Here's a side by side picture for comparison:

Sunday, August 7, 2011

I Built a Farmhouse Table

I built a table.

A legitimate dining-room table.

Totally serious.

Interested in building a piece of furniture too?

Start here: www.ana-white.com This is one of the coolest websites I've found.  Ana has a passion for building things, and for making her plans available for free online so that regular people like me can build our own furniture for WAY cheaper than retail.  She also bases many of her designs off name-brand furniture you can buy from Crate & Barrel or West Elm--but for much cheaper.

Find your plan.  I used THIS one.  The Farmhouse Table  Although I'll freely admit that I modified it a bit.  I wanted a shorter table with different legs than the original plan (4x4s) instead of 2, 2x4s attached, and no stretcher supports.  That meant that I had to modify things so that I could use my post legs without the stretcher supports.

Do all the math and you get something that looks like this:
HINT: Wood is not actually the length it says it is.  This was really frustrating.  A 4x4 post will actually only measure 3.5x3.5.  Take that into account when you're doing your math.  My table worked, but in the end, didn't need any of the spacers I planned.  And don't use my plan above.... the morning we started cutting & building is when I realized the wood anomaly.  This means that the above plan doesn't represent the actual measurements of the wood.  Sorry

Then buy your wood (and screws).  I got all of mine at Home Depot.  Make sure that your boards are SUPER straight.  This is really important.  We also used 3" AND 4" screws throughout the process.  We found out when we got to Home Depot that they don't actually sell 3.5" screws.
And I had to sit in the back with the wood because it was so long.
Then you get out your mighty mighty tape measure, square, and skill saw and start cutting your wood to length.  We did wait to cut the tabletop pieces until the end though, just to make sure everything would be the same

HINT: cut the "breadboard" (the two pieces on the end of the tabletop that run perpendicular to the rest of the tabletop) LAST.  This measurement was way off, and we ended up having to cut them over again--which meant buying more wood.

Then frame up the legs and sides.  We used a pocket hole jig to keep from needing to screw from the outside of the boards.  See more about pocket holes HERE.  Kreg Jig is just a brand name product--I got an off-brand Home Depot version for cheaper.

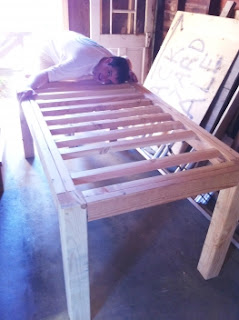
 Then we built the under-tabletop supports.  This piece was just 2, 2x4s with the 2x2 support pieces screwed into them like ladder rungs.  Then we set the under-tabletop support piece into the frame we built.
Then screwed the two pieces together.  This is Kevin, my table-building model.  I also convinced him to do a lot of the actual "power drilling" & "skill sawing" work.  He was just so good at it...
Then we turned the whole thing upright and tried to square it.  We got to about 1/2" off and called it good.

We measured and screwed in one of the breadboards to the tabletop, and then started on the 7 tabletop pieces that run perpendicular.  This was the exciting part.
This is, of course, when I realized that the breadboard pieces were too short (when cut to the exact measurements from Ana White's site--my guess is that the darn, "I'm not actually how long I say I am" wood sizes are the culprit.  Regardless, having the one breadboard piece in place made placement of the middle tabletop pieces a lot easier.  Then the breadboard piece was removed, a new 2x8 board was purchased, and the new breadboard pieces were cut and screwed into place.
Ta da!  Except because I didn't want those stretcher supports underneath, the whole thing was a bit wobbly.  So Kevin & I improvised and created some very simple triangle supports for the legs.  We just measured and cut from a leftover 2x4 and screwed them into place (after using a level to make sure things were square).
The table-making process took two days (or about 12 hours) to complete.  Then I took a week break and started in on the finishing process.

First, I sanded the table to within an inch of its life.  I bought a finishing sander from Home Depot and it was worth every penny.  I used several grits of sandpaper: 100, 120, and 150.  I was afraid to sand too much because I've heard you can essentially "stain" your wood by over-sanding & make it so stain doesn't soak in well.  That, and I was sick and tired of staining by that time.  It was really smooth to the touch.  I counted it good, and then used tack cloth to get ALL the sawdust off.

Wood conditioner is recommended for soft woods like pine (the lumber they generally sell in the regular section at Home Depot).  It's essentially two parts paint thinner to one part finish and really helps the soft woods evenly absorb the stain.  It closes the wood pores (which are very large on soft wood), so it will absorb less stain just in general--something to keep in mind if you want your project really dark.  It also gives the wood (in my opinion) a honey-ish looking color.

Then I tested a piece of wood for the staining process.  Six different options: 1) no wood conditioner, stain put on and immediately removed, 2) no wood conditioner, stain put on and left for 10 minutes, 3) wood conditioner wet (or newly applied) and stain put on and immediately removed, 4) wood conditioner wet and stain put on and left for 10 minutes, 5) wood conditioner left to dry overnight and stain put on and immediately removed, and 6) wood conditioner left to dry overnight and stain put on and left for 10 minutes. (Don't automatically just choose the directions from the back of the can--in my research I have found that wood conditioner needs the full 24 hours to dry to work correctly, even though the can says the stain needs to be applied immediately.)  For the look I was going for, I chose #6.  My stain was an oil-based Minwax Dark Walnut.  The wood conditioner gave it a warmer, honey-like tone underneath.
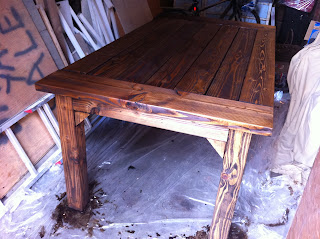
Staining the table was probably my absolutely favorite part of the process.  Be sure to put down a tarp to catch all the drops though.  And buy some Mineral Spirits beforehand.  It'll make the dalmatian look go right away once you're done with the stain.  It gets out stain AND polyurethane off skin & brushes, which is really helpful because soap (or dish soap) won't do the trick.  Although I've head that cooking/mineral oil will.

Use a rag to rub it on the stain, and an old cotton shirt or sweatshirt to rub it off.  Make sure to get all of the stain off afterwards, or it just becomes sticky/tacky and creates more problems when you go to finish the project.
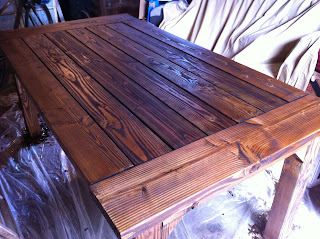
Let the stain dry completely (at least 24-28 hours).  Then you can apply another layer of stain if you want.  I've heard that past about two coats, your project won't get any darker though. I only did one coat and was really happy with the color.

I did quite a bit of reading on poly.  Oil vs. water. (P.S. Never use a water-based stain with an oil-based poly--you can use water over oil, but never oil over water. Check your labels!)  It's essentially a plastic coating to furniture, which will protect the wood from spills or liquids.  It doesn't have to be too shiny--you can choose from satin, semi-gloss, or gloss finishes to poly.  It's not the best finish for all wood projects, but it's a good solid, scratch-resistant, water-proof option for a dining room table (that isn't an "antique").

I did the first layer of oil-based poly (with a foam brush), then let it dry for at least 24 hours.  Being sure to use long, slow strokes to make a minimal amount of bubbles. After the first layer dried, the wood was a little rough, so I lightly, hand-sanded with a 220 grit sandpaper (I think any grit lower--e.g. 150--will only scratch the wood too much), wiped everything off with tack cloth, and applied the next layer of poly (and let it dry for another 24 hours).  Then sanded with 220 grit again, wiped off with tack cloth, and applied my third and final layer of poly.  Now the coating was smooth.

At this point, the table is done!  Unfortunately polyurethane takes approximately 2-4 weeks to "cure".  It will be dry to the touch in 24 hours, and you can start using it after 7 days, but don't leave anything sitting on it for long periods of time, otherwise it will sink into the poly layer.  You can't see it, but apparently the molecules within the poly layer are still moving around, even though the layer feels hard to the touch.  I've also heard that it can take up to a year for the poly layer to be completely cured.

So I left my table in my shed for a couple weeks, let it off-gas its VOCs outside, and then got Kevin and my dad to carry it around the mulberry bush and into my house.  Where it looks absolutely gorgeous (even without chairs!).

Cost breakdown:  Had I bought a brand new, retail 6'x3'(ish) table, it would have probably cost about $1,000.  Instead, I spent:
Home Depot wood & screws: $110 (or very close)  The 4x4" posts were the most expensive.
Pocket hole jig: $30
Power finishing sander & sandpaper: $35
Stain, polyurethane, and foam brushes: $20
TOTAL: About $200
Such a fun project--even for an amateur--and a totally successful "30 before 30" list achievement (with a whole bunch of stories/memories made in the process).