Friday, August 19, 2011

DIY yellow cluster necklace

I loved this necklace, but couldn't find it anywhere online to buy--according to a Marie Claire webpage the original price was $190.  So I decided to DIY it instead.

Time: about 2 hours

Cost: $15.27 (metal necklace supplies: $9.97; beads: $5.30)

Here's what I bought (everything from Michaels Craft store, except the beads.  The beads were from www.usbeadery.com):

*Chain
*Clasp set
*Eye pins

 *Beads (2 sizes) from www.usbeadery.com


Acrylic opaque yellow round 18mm
Acrylic opaque yellow round 12mm

You'll also need some wire cutters & pliers.  Here are all of my supplies


First, cut your chain to the desired length, then attach your clasp set to the ends.  Remember that the beads will make the chain a little bulky in the end.

Then, start with your larger beads.  Take an eye pin and string it through the bead.  Then use your pliers to bend the eyelet of the pin over so it lays flat against the bead (I liked this look better in the end, and I was unable to find pins like in the inspiration pictures--flat head--that were big enough to hold the beads on).

Then string your eye pin onto the chain
Cut off some of the excess eye pin with your wire cutters
Then use your pliers to bend the eye pin around to secure the bead to the chain.  Loop the loose end around like you're trying to insert it into the hole of the bead.  You're essentially creating a loop with the eye pin.

Continue beading the large beads, then move on to the small ones, filling in the holes as you like.  I held the necklace up each time to see where I wanted to add more to.
And then you're done.  Super easy.
Here's a side by side picture for comparison:

Sunday, August 7, 2011

I Built a Farmhouse Table

I built a table.

A legitimate dining-room table.

Totally serious.

Interested in building a piece of furniture too?

Start here: www.ana-white.com This is one of the coolest websites I've found.  Ana has a passion for building things, and for making her plans available for free online so that regular people like me can build our own furniture for WAY cheaper than retail.  She also bases many of her designs off name-brand furniture you can buy from Crate & Barrel or West Elm--but for much cheaper.

Find your plan.  I used THIS one.  The Farmhouse Table  Although I'll freely admit that I modified it a bit.  I wanted a shorter table with different legs than the original plan (4x4s) instead of 2, 2x4s attached, and no stretcher supports.  That meant that I had to modify things so that I could use my post legs without the stretcher supports.

Do all the math and you get something that looks like this:
HINT: Wood is not actually the length it says it is.  This was really frustrating.  A 4x4 post will actually only measure 3.5x3.5.  Take that into account when you're doing your math.  My table worked, but in the end, didn't need any of the spacers I planned.  And don't use my plan above.... the morning we started cutting & building is when I realized the wood anomaly.  This means that the above plan doesn't represent the actual measurements of the wood.  Sorry

Then buy your wood (and screws).  I got all of mine at Home Depot.  Make sure that your boards are SUPER straight.  This is really important.  We also used 3" AND 4" screws throughout the process.  We found out when we got to Home Depot that they don't actually sell 3.5" screws.
And I had to sit in the back with the wood because it was so long.
Then you get out your mighty mighty tape measure, square, and skill saw and start cutting your wood to length.  We did wait to cut the tabletop pieces until the end though, just to make sure everything would be the same

HINT: cut the "breadboard" (the two pieces on the end of the tabletop that run perpendicular to the rest of the tabletop) LAST.  This measurement was way off, and we ended up having to cut them over again--which meant buying more wood.

Then frame up the legs and sides.  We used a pocket hole jig to keep from needing to screw from the outside of the boards.  See more about pocket holes HERE.  Kreg Jig is just a brand name product--I got an off-brand Home Depot version for cheaper.

 Then we built the under-tabletop supports.  This piece was just 2, 2x4s with the 2x2 support pieces screwed into them like ladder rungs.  Then we set the under-tabletop support piece into the frame we built.
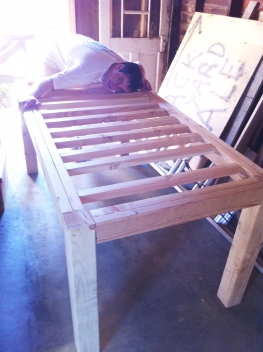
Then screwed the two pieces together.  This is Kevin, my table-building model.  I also convinced him to do a lot of the actual "power drilling" & "skill sawing" work.  He was just so good at it...
Then we turned the whole thing upright and tried to square it.  We got to about 1/2" off and called it good.

We measured and screwed in one of the breadboards to the tabletop, and then started on the 7 tabletop pieces that run perpendicular.  This was the exciting part.
This is, of course, when I realized that the breadboard pieces were too short (when cut to the exact measurements from Ana White's site--my guess is that the darn, "I'm not actually how long I say I am" wood sizes are the culprit.  Regardless, having the one breadboard piece in place made placement of the middle tabletop pieces a lot easier.  Then the breadboard piece was removed, a new 2x8 board was purchased, and the new breadboard pieces were cut and screwed into place.
Ta da!  Except because I didn't want those stretcher supports underneath, the whole thing was a bit wobbly.  So Kevin & I improvised and created some very simple triangle supports for the legs.  We just measured and cut from a leftover 2x4 and screwed them into place (after using a level to make sure things were square).
The table-making process took two days (or about 12 hours) to complete.  Then I took a week break and started in on the finishing process.

First, I sanded the table to within an inch of its life.  I bought a finishing sander from Home Depot and it was worth every penny.  I used several grits of sandpaper: 100, 120, and 150.  I was afraid to sand too much because I've heard you can essentially "stain" your wood by over-sanding & make it so stain doesn't soak in well.  That, and I was sick and tired of staining by that time.  It was really smooth to the touch.  I counted it good, and then used tack cloth to get ALL the sawdust off.

Wood conditioner is recommended for soft woods like pine (the lumber they generally sell in the regular section at Home Depot).  It's essentially two parts paint thinner to one part finish and really helps the soft woods evenly absorb the stain.  It closes the wood pores (which are very large on soft wood), so it will absorb less stain just in general--something to keep in mind if you want your project really dark.  It also gives the wood (in my opinion) a honey-ish looking color.

Then I tested a piece of wood for the staining process.  Six different options: 1) no wood conditioner, stain put on and immediately removed, 2) no wood conditioner, stain put on and left for 10 minutes, 3) wood conditioner wet (or newly applied) and stain put on and immediately removed, 4) wood conditioner wet and stain put on and left for 10 minutes, 5) wood conditioner left to dry overnight and stain put on and immediately removed, and 6) wood conditioner left to dry overnight and stain put on and left for 10 minutes. (Don't automatically just choose the directions from the back of the can--in my research I have found that wood conditioner needs the full 24 hours to dry to work correctly, even though the can says the stain needs to be applied immediately.)  For the look I was going for, I chose #6.  My stain was an oil-based Minwax Dark Walnut.  The wood conditioner gave it a warmer, honey-like tone underneath.
Staining the table was probably my absolutely favorite part of the process.  Be sure to put down a tarp to catch all the drops though.  And buy some Mineral Spirits beforehand.  It'll make the dalmatian look go right away once you're done with the stain.  It gets out stain AND polyurethane off skin & brushes, which is really helpful because soap (or dish soap) won't do the trick.  Although I've head that cooking/mineral oil will.

Use a rag to rub it on the stain, and an old cotton shirt or sweatshirt to rub it off.  Make sure to get all of the stain off afterwards, or it just becomes sticky/tacky and creates more problems when you go to finish the project.
Let the stain dry completely (at least 24-28 hours).  Then you can apply another layer of stain if you want.  I've heard that past about two coats, your project won't get any darker though. I only did one coat and was really happy with the color.

I did quite a bit of reading on poly.  Oil vs. water. (P.S. Never use a water-based stain with an oil-based poly--you can use water over oil, but never oil over water. Check your labels!)  It's essentially a plastic coating to furniture, which will protect the wood from spills or liquids.  It doesn't have to be too shiny--you can choose from satin, semi-gloss, or gloss finishes to poly.  It's not the best finish for all wood projects, but it's a good solid, scratch-resistant, water-proof option for a dining room table (that isn't an "antique").

I did the first layer of oil-based poly (with a foam brush), then let it dry for at least 24 hours.  Being sure to use long, slow strokes to make a minimal amount of bubbles. After the first layer dried, the wood was a little rough, so I lightly, hand-sanded with a 220 grit sandpaper (I think any grit lower--e.g. 150--will only scratch the wood too much), wiped everything off with tack cloth, and applied the next layer of poly (and let it dry for another 24 hours).  Then sanded with 220 grit again, wiped off with tack cloth, and applied my third and final layer of poly.  Now the coating was smooth.

At this point, the table is done!  Unfortunately polyurethane takes approximately 2-4 weeks to "cure".  It will be dry to the touch in 24 hours, and you can start using it after 7 days, but don't leave anything sitting on it for long periods of time, otherwise it will sink into the poly layer.  You can't see it, but apparently the molecules within the poly layer are still moving around, even though the layer feels hard to the touch.  I've also heard that it can take up to a year for the poly layer to be completely cured.

So I left my table in my shed for a couple weeks, let it off-gas its VOCs outside, and then got Kevin and my dad to carry it around the mulberry bush and into my house.  Where it looks absolutely gorgeous (even without chairs!).

Cost breakdown:  Had I bought a brand new, retail 6'x3'(ish) table, it would have probably cost about $1,000.  Instead, I spent:
Home Depot wood & screws: $110 (or very close)  The 4x4" posts were the most expensive.
Pocket hole jig: $30
Power finishing sander & sandpaper: $35
Stain, polyurethane, and foam brushes: $20
TOTAL: About $200
Such a fun project--even for an amateur--and a totally successful "30 before 30" list achievement (with a whole bunch of stories/memories made in the process).

Tuesday, July 19, 2011

Drifting

I graduated from college without a clue of what I wanted to do.

Within six months of graduating, I was positive that I already knew what "that" was.

When I told people, they always told me I was lucky to know so early.  I couldn't help it, but I loved it none the less.  Who wouldn't want to know their life direction so early on?  That definitely "fit" the plan I had for life (generally speaking).  I guess that should have been my first red flag.

Now three plus years later, I think I might have been mistaken.  After chasing the elusive dream (that I was so certain of for so long), it no longer looks worth chasing.  Sure, it'd probably still be fun.  But, for the first time in years, I've been forced to reassess what that means for me.  I thought I was just following God's plans... I felt it was inevitable.

Now, I think I'm headed in another direction.
The scariest part is that I have no idea what the new direction is.  And that definitely doesn't fit into my ideal plans.  Nor does change or uncertainty. 

I'm not exactly navigating well either.  Feeling adrift isn't my idea of fun.  And try as I might, I've never been the greatest at the "go with the flow" mentality.  Life is shifting around me.  I just wish I knew what direction it is shifting in.

Monday, July 18, 2011

I'm not a dreamer

From what I understand, there are two trains of thought about personal facts (you state about yourself).

  1. You're never allowed to say "not", "can't", "never", etc; lest you hold yourself back from something.
  2. You recognize your individual gifting(s), and reasonably state your abilities (as you see them).

I fall into the latter category.  I actually like that facet about myself.  I like that I know what I'm reasonably capable of, while still being willing to stretch myself (reasonably).  I think it's a strength to know yourself well enough to do that.
My visionary boss disagrees.  I get into a lot of word-smithing messes over this issue.  Unfortunately, no matter how often he shares his view on this, I still disagree.

Therefore (according to my own belief of thought), I can state in all honesty that I am not a dreamer.  Or a visionary.  Or an overwhelming personality able to draw people in naturally with great ideas.

I'm a realist.  I see the facts.  I see the gaps.  I see the potential problems.  I also don't think this is bad.  Tempered with visionaries, it's a good combination of creative ideas and practical application all mixed together.

But put me in a group of all visionaries and I quickly become the unpleasant voice in the group.  The resident "killjoy".  Honestly, even for a realist, no one wants to be that.  I hate being the unpleasant reminder that practicality defeats that wonderful, utopian idea.  It's like killing cute, little puppies and kittens.  Yet, isn't that information valuable at some level?  At some point?

So I hold my tongue and say nothing.  And then I feel (or am perceived) as unengaged or not opinionated.  Quiet and unresponsive.  But no one really wants to hear my opinion.  In "word" they do, of course they want everyone to feel valued and able to share, but they don't really want the cold, hard, reality I bring.  At least not so quickly.  I guess at least.

Essentially, I feel like I lose at all levels of those conversations.  How can I be myself (the realist), while interacting with a big bunch of visionaries?  I feel like I'm doomed to failure after all of these conversations.  I literally feel like I'm unable to succeed.  There is very little more frustrating than that.

Thursday, July 7, 2011

The future

I hate having this conversation.  The one that highlights my fears, my insecurities, my inability to trust and let go.  I hate disappointing people too.  But all too often I feel like that is exactly what I'm doing.

I've stopped looking forward.  Sure, I "look forward" to small things; certain meals, upcoming events, vacations, etc.  But I've stopped forward looking.  Anything that begs the question, "where do you see yourself in 5 years" is instantly shrugged off.  After several failed relationships, friendships, and life plans, I seem to have given up.  Not given up on life, but given up on setting 5-10 year goals (or really, anything farther than the next 6 months).

I don't even have a visual picture of my life in 5 years.  I simply can't see it.  And I've gotten so good (?) at refusing to set unrealistic expectations for my life, that I no longer set any expectations farther than dinner, or perhaps next week. 
This invariably makes the future the scariest option around.  When asked to consider it, my brain automatically panics.  I don't do this.  I don't picture the future anymore, lest I end up hurt and disappointed again when things don't go as planned.  I have placed too many safeguards in place.  I simply can't do it.  At least I won't allow myself to.

The present is stressful enough.  The future is downright terrifying.  But somehow I think I got off track somewhere.  Somehow I think that conversations about the future shouldn't scare me quite as much as they currently do.  That perhaps I have taken "unrealistic expectations" to an entirely new level. 

Friday, July 1, 2011

I miss food

It took me an hour to eat dinner last night.

This is day three of immobilizing jaw pain.  The I-can't-open-my-mouth-properly-without-terrible-pain kind. I think my remaining wisdom teeth are to blame.  I frantically called my dentist yesterday when I was certain I wouldn't make it through the long weekend, and they graciously got me in for Friday.

Of course through all of this, all I can think about is food.  Glorious food, that is officially too painful to eat.  So I'm sipping on a smoothie that the boyfriend (who is immeasurably thoughtful) brought for lunch and dreaming about hot dogs and corn salsa, and popcorn (yep, you can judge my food choices if you want). 
Image from GiantEagle.com.
The other focus area is how debilitating this is.  I can still walk, breathe, type, work, drive, blah, blah, blah.  But I can focus on very little aside from the pain, the personal level of panic over something being wrong, or my impromptu wisdom tooth removal tonight.  I don't feel "sick", but I'm definitely not healthy.  It's such a strange place.  I'm used to colds, or the flu, or a physical injury, but not this.

Weekend plans are on hold.  Who knows what tomorrow will be like.  Who knows how the rest of the long weekend will pan out.  All because of a stupid tooth (which, might I add, sat there for months without causing a lick of trouble and then all of a sudden decides to spaz out and take my entire mouth with it).

I try very hard to be a "go with the flow" kind of person.  I don't always succeed.  Situations like this necessitate it, but I still hate them.  I would rather have the whole plan worked out in my head (and maybe never vocalized) and change it at the last minute than to be completely in the dark.

It's another opportunity to grow.  Seriously though, did it have to be this painful?

P.S. I had a college roommate who struggled with a stomach problem that they were never able to diagnose.  She figured out that most pain (which could leave her doubled over) came from eating.  She hardly eats.  Bowls of cereal are pretty much it.  You'd never know though, unless you asked (or unless you were like me, and saw her lying on her bed in excruciating pain).  She didn't make it the focus of everything (although I'm sure it dominated her thoughts).  I can't help but cringe when I think of how I respond to pain.  I'm pretty sure my response is not the same.

UPDATE:  The wisdom tooth removal went smoother than smooth.  Took less than 20 minutes from the time I sat down in the chair until I was back out the door.  No pain all weekend (which is funny, since I was popping ibuprofen like candy earlier in the week for pain), and aside from eating carefully and trying to stay away from the worst foods (for my condition) it was like it never happened.  So, my weekend plans of building a table from lumber bought from Home Depot, and painting a room were not delayed.  Quite the holiday weekend, and thankfully, pain free.

Wednesday, June 29, 2011

Alot of...

After reading THIS post by Hyperbole and a Half (which is one of the funniest blogs ever).  I became obsessed with "alots".  The grammarian in me cringes even when I type it.  But somehow I have convinced myself that it's more of a noun than an adverb.  Somehow...

And, I think the very same website is to blame for my insistence on drawing funny pictures in paint.  I think I may just be trying to prove my epic level of funny.  Not sure it's working, but since I haven't written anything else in a while, I thought I would show you some of my more inspiring drawings.

Read THIS post about the "alots", or the pictures probably won't make much sense.

Here is the original alot.
Gratuitously stolen from Hyperbole and a Half  


Here are some of mine:
This is the rainbow alot.  Or "I see rainbows alot"  Which is true.  Too much rain.
This is the Save-alot.  A funny rendition of an actual store.  Ignore the text.  The picture has other uses before I decided to put it on the interwebs.
Obviously I stole the alot here and added my own train.
And this is my masterpiece from yesterday.  A mix of my strange fear of getting hit by trains and my strange obsession with alots.  I haven't actually decided who wins.  Although I'll tell you, I'm rooting for the alot.